How to setup Emacs for Rust development
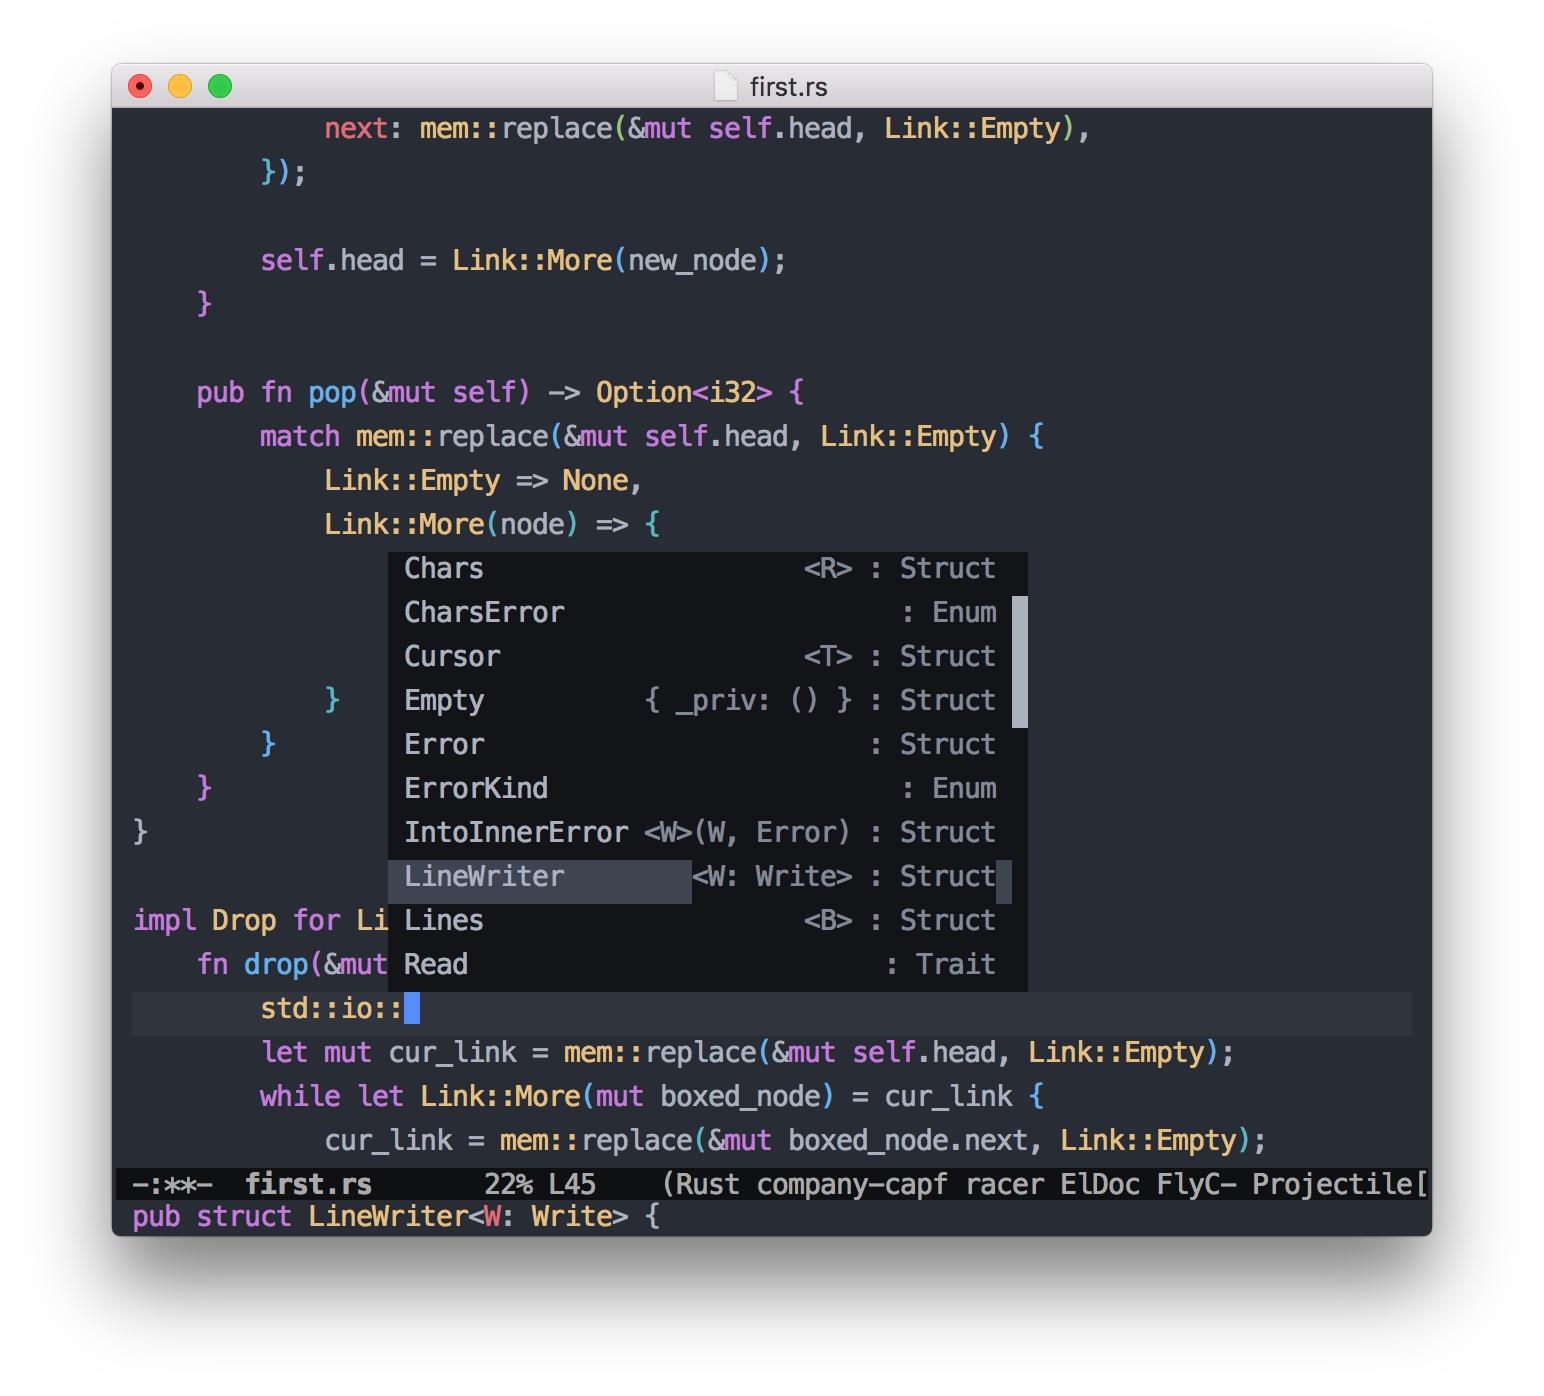
In this post I will show you how to setup Emacs for the Rust development. We will start with empty setup and then move iteratively adding new features. At the end of the process you should have something similar to the following screenshot:
Initial setup
Emacs loads it’s configuration from initialization file which can be
~/.emacs, ~/.emacs.el, or .emacs.d/init.el.
We will use .emacs.d/init.el file as configuration script. Let’s create it:
$ mkdir ~/.emacs.d
$ cd ~/.emacs.d
$ touch init.el
$ git init .
Here, we created initialization file as well as new git repository inside
.emacs.d directory. Git step is optional and it has nothing to do with
Emacs configuration. However, I strictly advise not to skip it, because putting
your configuration directory under the source control allows you to have version
tracking, rollbacks, backups (just create a new repository on
http://bitbucket.com or similar resource and sync your local repository with the
remote one).
Now, create ~/.emacs.d/.gitignore file with the following content:
*~
places
\.recentf
\.smex-items
ido.last
projectile-bookmarks.eld
projectile.cache
auto-save-list
backups
elpa/
eshell
Commit your changes to the source control.
What to put into init.el file
You can put all your configuration inside Emacs initialization file. However this is not a best idea. As we know from software development it is much better to group similar things into modules/packages/you-name-it to simplify future reuse, changes, etc.
We will use init.el file as an entry point that loads all other scripts.
Open init.el file and add the following code to it:
(add-to-list 'load-path (expand-file-name "lisp" user-emacs-directory))

(provide 'init)
Here we tell Emacs that we will put all our custom scripts into ~/.emacs.d/lisp
folder so that Emacs can find them when we use require function to load these
scripts. You can read more about loading scripts in Emacs Lisp
here.
Packages
Package is an Emacs Lisp program that provides additional features. You can read about Emacs packages here.
In fact all our scripts will be Emacs packages because this simplifies dependency management and has ultra-speed load time.
Add (require 'init-elpa) line to the ~/.emacs.d/init.el script. Now it
should look like this:
(add-to-list 'load-path (expand-file-name "lisp" user-emacs-directory))

(require 'init-elpa)

(provide 'init)
This line will load ~/.emacs.d/lisp/init-elpa.el and all its dependencies.
Now create ~/.emacs.d/lisp/init-elpa.el file, open it for editing and put the
following code in it:
(require 'package)

(defun require-package (package)
  "Install given PACKAGE if it was not installed before."
  (if (package-installed-p package)
      t
    (progn
      (unless (assoc package package-archive-contents)
	(package-refresh-contents))
      (package-install package))))

(add-to-list 'package-archives
	     '("melpa" . "https://melpa.org/packages/"))

(package-initialize)

(provide 'init-elpa)
This package initializes Emacs package system, adds MELPA the
list of available package archives and defines a function require-package that
installs the given package if it was not installed before.
Exec path [OS X only]
The next step is specific to OS X, where an Emacs instance started from the GUI
will have a different environment than a shell in a terminal window,
because OS X does not run a shell during the login. Obviously this will lead to
unexpected results when calling external utilities like make from Emacs.
So here we are going to solve this issue by using exec-path-from-shell package.
Add the line (require 'init-exec-path) after the last require in the
~/.emacs.d/init.el file:
(add-to-list 'load-path (expand-file-name "lisp" user-emacs-directory))

(require 'init-elpa)
(require 'init-exec-path)

(provide 'init)
In the future, when I say add require to the initialization file it means
add it to the ~/.emacs.d/init.el file after the last require as in previous
example.
|
Now open ~/.emacs.d/lisp/init-exec-path.el and fill it with the following code:
(require 'init-elpa)

(require-package 'exec-path-from-shell)
(when (memq window-system '(mac ns x))
  (exec-path-from-shell-initialize))

(provide 'init-exec-path)
First, we require 'init-elpa package we created before to use its require-package
function.
Second, we execute exec-path-from-shell-initialize function only
if this instance of Emacs is run under the OS X.
UI
Now it’s time to deal with default Emacs UI. Add (require 'init-ui) to Emacs
initialization file, then open ~/.emacs.d/lisp/init-ui.el and add the following
lines:
(require 'init-elpa)
(require-package 'atom-one-dark-theme)
(require-package 'golden-ratio)

(require 'golden-ratio)

(setq inhibit-startup-message t)
(menu-bar-mode -1)
(when (fboundp 'tool-bar-mode)
  (tool-bar-mode -1))
(when (fboundp 'scroll-bar-mode)
  (scroll-bar-mode -1))

(set-face-attribute 'default nil :height 140)
(setq-default line-spacing 0.4)

(setq
      x-select-enable-clipboard t
      x-select-enable-primary t
      save-interprogram-paste-before-kill t
      apropos-do-all t
      mouse-yank-at-point t)

(load-theme 'atom-one-dark t)

(blink-cursor-mode 0)
(setq-default cursor-type 'bar)
(set-cursor-color "#cccccc")
(setq ring-bell-function 'ignore)

(golden-ratio-mode 1)

(provide 'init-ui)
There is a little bit more code in this package than in the previous. It turns off menu bar, scroll bar, and tool bar, as well as standard welcome message. It installs and loads Atom One dark syntax theme.
Another important feature is Golden Ratio. It resizes Emacs windows automatically to make the window that has the focus to have perfect size for editing.
Editing
The next step is to make editing a little bit more convenient.
Add (require 'init-editing) to the initialization file, open
~/.emacs.d/lisp/init-editing.el script and add the following:
(require 'init-elpa)
(require 'saveplace)
(require-package 'rainbow-delimiters)
(require-package 'flycheck)

;; Highlights matching parenthesis
(show-paren-mode 1)

;; Highlight current line
(global-hl-line-mode 1)

;; Interactive search key bindings. By default, C-s runs
;; isearch-forward, so this swaps the bindings.
(global-set-key (kbd "C-s") 'isearch-forward-regexp)
(global-set-key (kbd "C-r") 'isearch-backward-regexp)
(global-set-key (kbd "C-M-s") 'isearch-forward)
(global-set-key (kbd "C-M-r") 'isearch-backward)

(define-key global-map (kbd "RET") 'newline-and-indent)

(add-hook 'after-init-hook #'global-flycheck-mode)

;; When you visit a file, point goes to the last place where it
;; was when you previously visited the same file.
;; http://www.emacswiki.org/emacs/SavePlace

(setq-default save-place t)
;; keep track of saved places in ~/.emacs.d/places
(setq save-place-file (concat user-emacs-directory "places"))

;; Emacs can automatically create backup files. This tells Emacs to
;; put all backups in ~/.emacs.d/backups. More info:
;; http://www.gnu.org/software/emacs/manual/html_node/elisp/Backup-Files.html
(setq backup-directory-alist `(("." . ,(concat user-emacs-directory
                                               "backups"))))
(setq auto-save-default nil)

(defun toggle-comment-on-line ()
  "Comment or uncomment current line."
  (interactive)
  (comment-or-uncomment-region (line-beginning-position) (line-end-position)))
(global-set-key (kbd "C-;") 'toggle-comment-on-line)

(add-hook 'prog-mode-hook #'rainbow-delimiters-mode)

(provide 'init-editing)
It is pretty good documented. Just go through it and read the source :)
Navigation
Add (require 'init-navigation) to the initialization file and open
~/.emacs.d/lisp/init-navigation.el script.
We are going to install and configure the following packages:
-
Interactively Do Things or
Idomode. I advise you to read Introduction to Ido Mode. -
ido-ubiquitous mode. This package replaces stock emacs completion with Ido completion wherever it is possible to do so without breaking things.
-
Smex. Built on top of Ido, it provides a convenient interface to your recently and most frequently used commands. And to all the other commands, too.
-
Recentf. Recentf is a minor mode that builds a list of recently opened files. This list is automatically saved across sessions on exiting Emacs - you can then access this list through a command or the menu.
-
Projectile. It provides easy project management and navigation. Please refer to the link I’ve provide for complete list of features.
And here is the code:
(require 'init-elpa)
(require 'ido)
(require 'recentf)
(require-package 'ido-ubiquitous)
(require-package 'smex)
(require-package 'projectile)

(setq recentf-save-file (concat user-emacs-directory ".recentf"))
(recentf-mode 1)
(setq recentf-max-menu-items 40)

(ido-mode t)
(setq ido-enable-flex-matching t)
(setq ido-use-filename-at-point nil)
(setq ido-auto-merge-work-directories-length -1)
(setq ido-use-virtual-buffers t)

(ido-ubiquitous-mode 1)

;; Shows a list of buffers
(global-set-key (kbd "C-x C-b") 'ibuffer)

(setq smex-save-file (concat user-emacs-directory ".smex-items"))
(smex-initialize)
(global-set-key (kbd "M-x") 'smex)

(projectile-global-mode)

;; Enable move point from window to window using Shift and the arrow keys
(windmove-default-keybindings)

(provide 'init-navigation)
Miscellaneous
Here we will setup a few things to make Emacs to be more convenient to use.
Add (require 'init-miscellaneous) to the initialization file and open the
~/.emacs.d/lisp/init-miscellaneous.el for editing. Add the following lines:
;; Changes all yes/no questions to y/n type
(fset 'yes-or-no-p 'y-or-n-p)

;; No need for ~ files when editing
(setq create-lockfiles nil)

(provide 'init-miscellaneous)
It changes yes/no questions to y/n type so that you can just press y or n,
instead of typing yes or no. Also this packages disables generation of
Emacs lock files.
Text Completion
Emacs has very good text completion framework called company-mode. Let’s install and configure it.
Add (require 'init-company-mode) to the initialization file as usual, then
open ~/.emacs.d/lisp/init-company-mode.el script and add these lines:
(require 'init-elpa)
(require-package 'company)
(require 'company)

(setq company-tooltip-align-annotations t)
(add-hook 'prog-mode-hook 'company-mode)

(provide 'init-company-mode)
Here, we enable company mode for all programming modes making it default autocompletion engine.
Now save everything and commit to the source control.
Rust Support
Please, make sure that you have Rust installed before continue.
Now here is the thing. We have to install third-party tools to make Rust autocompletion work.
Install Racer
Please, follow the Racer installation guideline to install it on your machine.
Install Rust sources
Clone the https://github.com/rust-lang/rust repository.
Configure Rust Support in Emacs
As usual, add (require 'init-rust) to the initialization file and add the
following code to the ~/.emacs.d/lisp/init-rust.el package:
(require 'init-elpa)
(require-package 'company)
(require-package 'racer)
(require-package 'rust-mode)
(require-package 'flycheck)
(require-package 'flycheck-rust)

(require 'company)
(require 'racer)
(require 'rust-mode)
(require 'electric)
(require 'eldoc)
(require 'flycheck)
(require 'flycheck-rust)

(add-to-list 'auto-mode-alist '("\\.rs\\'" . rust-mode))
(add-hook 'rust-mode-hook  #'company-mode)
(add-hook 'rust-mode-hook  #'racer-mode)
(add-hook 'racer-mode-hook #'eldoc-mode)
(add-hook 'flycheck-mode-hook #'flycheck-rust-setup)
(add-hook 'rust-mode-hook
          '(lambda ()
	     (setq racer-cmd (concat (getenv "HOME") "/.rust-dev/racer/target/release/racer"))
	     (setq racer-rust-src-path (concat (getenv "HOME") "/.rust-dev/rust/src"))
             (local-set-key (kbd "TAB") #'company-indent-or-complete-common)
	     (electric-pair-mode 1)))

(provide 'init-rust)
This package installs the following dependencies:
-
Flycheck. This is a modern on-the-fly syntax checking extension.
-
flycheck-rust. It adds Rust syntax checking and linting to Flycheck.
-
rust-mode. This adds Rust syntax highlighting, etc.
-
racer. It allows Emacs to use Racer for Rust code completion and navigation.
Please, change the path to the racer executable (racer-cmd variable) and the
path to the Rust sources (racer-rust-src-path variable) according to your
local environment.
For example, I downloaded racer to the ~/.rust-dev/racer folder and Rust
sources to the ~/.rust-dev/rust.
Save everything, commit to the source control, start Emacs. Wait until it finishes installing missing packages, then restart it.
Now you should have Rust syntax highlighting, autocomplete, and project navigation in your beloved Emacs.
You can find my Emacs config here.
That’s it.