How to create an input form using UITableView
UITableView is a powerful UI element that is used in various scenarios of iOS application development.
In this article we will learn how to use it to build UI for input forms. When we finish implementation, we will have something similar to this:

Let’s get started
Create a Single View Application project, open Main.storyboard and delete view controller that is already there. Delete ViewController.swift file as well.
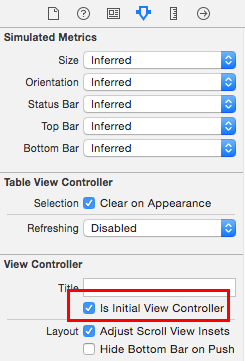
Drag and drop Table View Controller on the storyboard’s surface and make it initial view controller using Attribute Inspector:
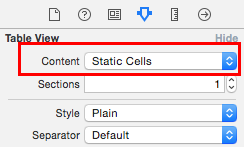
UITableView can contain dynamic or static cells. We need the second one to build an input form:
Go to Document Outline and delete all table view cells except the first one.
Design Table Cell
Label, View and Text Field
Now we can design our cell. Later we will copy/paste it to create more table cells with the same visual appearance.
Drag and drop one Label, one View and one Text Field on the cell’s surface. Set background color of the View to
#CCCCCC, and Alpha to 0.5. Reorder and change sizes of UI elements to correspond to the image below:

Select Table View Cell in the Document Outline and set its background to #FCFFE1, Then select the Label and set
its font to Caption 1 and its color to #42AEDD. Set its alignment to Right. Now select the Text Field and set
its border style to None. Finally, set its font to Body.
You should have something similar to this now:

Auto Layout
Let’s add Auto Layout constraints to the UI elements inside this cell.
Label
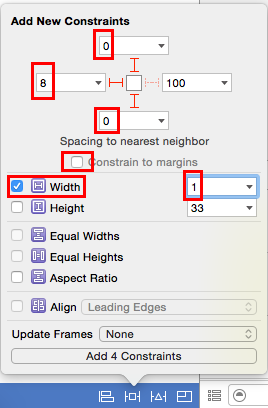
Select label and click on Pin button. Set constraints as shown in the screenshot below:

View
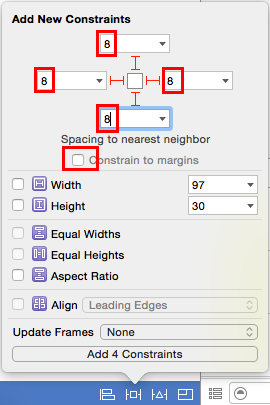
Select view and click on Pin button. Set constraints as shown in the screenshot:
Text Field
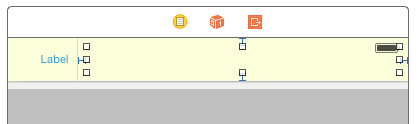
Now add constraints to the text field as shown in the screenshot:
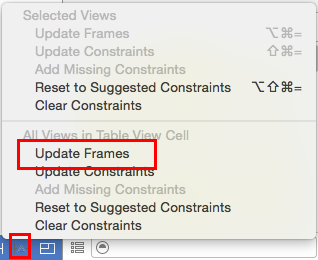
Update Frames
Click on Resolve Auto Layout Issues button and select Update Frames menu item to make Interface Builder re-layout UI elements according to added Auto Layout constraints:
Now our table view cell should look like this:
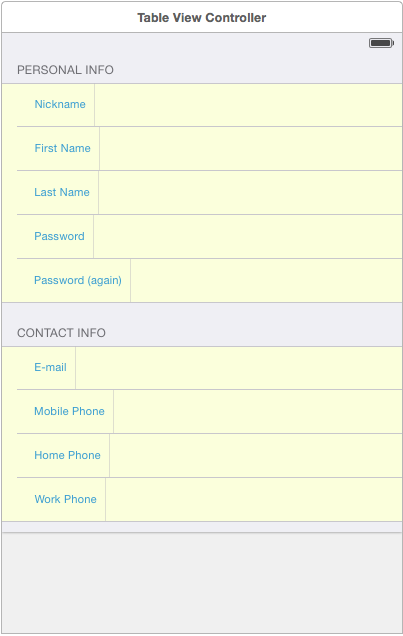
Design Personal Info Section
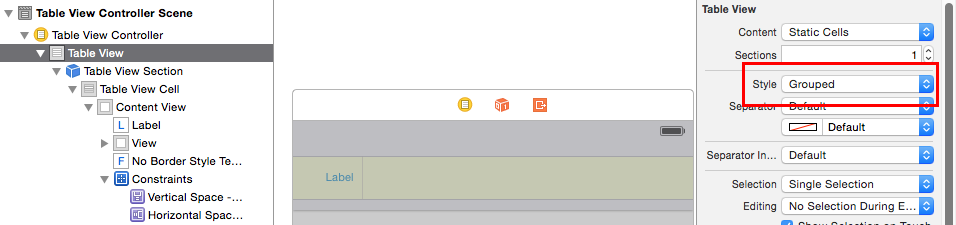
Select Table View and set its style to Grouped:
This will make table view to show sections. Now select Table View Section in the Document Outline and set its
Header property to Personal Info.
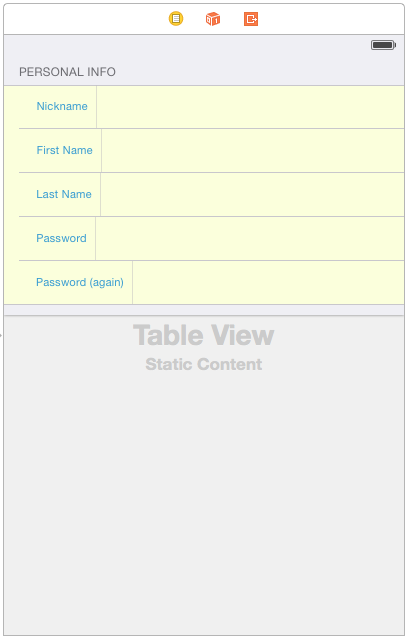
Select Table View Cell in the Document Outline and copy paste it four times. Now you should have five rows in the Personal Info section. Update text of labels inside these rows to values from the following list:
-
Nickname
-
First Name
-
Last Name
-
Password
-
Password (again)
Then select all table view cells and click on Update Frames. Now you should have something like this:
If labels' fonts are different after the Copy/Paste - just close and reopen Xcode. This should fix the issue.
Design Contact Info Section
Copy and paste previous section, change text, remove extra rows, update frames. This is how your table view should look like:
Make Labels to Have the Same Width
As you noticed, all labels have different widths and because of that vertical lines have different positions. There is a special Auto Layout constraint called Equal Widths:
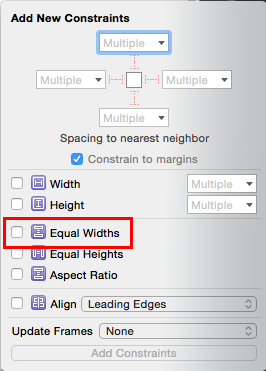
This constraint makes all selected items to have the same width. Unfortunately, it’s not possible to apply it to the UI elements, that have different root views.
However it is possible to fix this in code:
-
Find label with the highest width value.
-
Add Auto Layout constraints to all labels to have exactly this width.
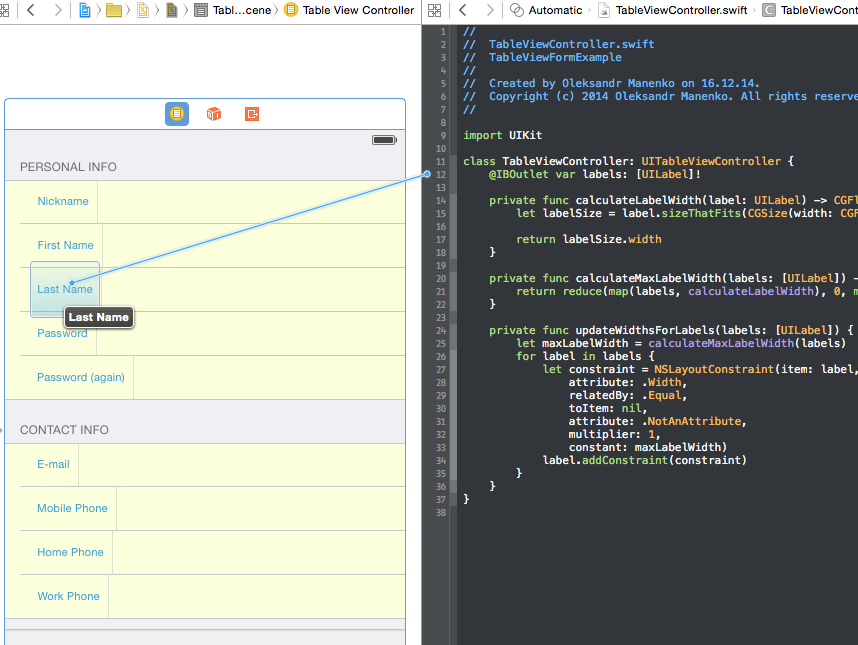
Create new Cocoa Touch Class, and inherit it from UITableViewController. Call it TableViewController. Then select
Table View Controller in the storyboard and set its class to TableViewController in the Identity Controller.
Go back to the TableViewController class and remove all methods from it.
The following method calculates label’s width:
private func calculateLabelWidth(label: UILabel) -> CGFloat {
    let labelSize = label.sizeThatFits(CGSize(width: CGFloat.max, height: label.frame.height))

    return labelSize.width
}
I use sizeThatFits(_:) method of the UIView class to calculate size of the UILabel.
The next step is to find maximum width of labels:
private func calculateMaxLabelWidth(labels: [UILabel]) -> CGFloat {
    return reduce(map(labels, calculateLabelWidth), 0, max)
}
The next method adds Auto Layout constrains to constrain label widths:
private func updateWidthsForLabels(labels: [UILabel]) {
let maxLabelWidth = calculateMaxLabelWidth(labels)
for label in labels {
let constraint = NSLayoutConstraint(item: label,
attribute: .Width,
relatedBy: .Equal,
toItem: nil,
attribute: .NotAnAttribute,
multiplier: 1,
constant: maxLabelWidth)
label.addConstraint(constraint)
}
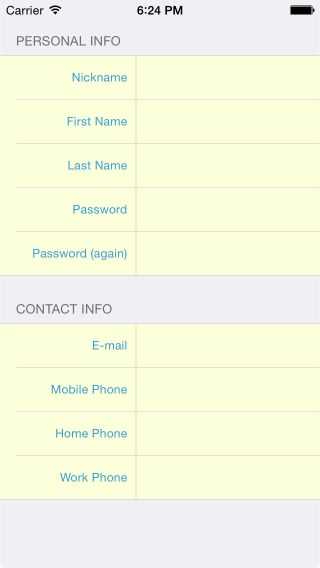
}Now we need list of labels to apply this method to. Add outlet collection property:
@IBOutlet var labels: [UILabel]!And link it with all labels on the input form:
Update widths in viewDidLoad:
override func viewDidLoad() {
    updateWidthsForLabels(labels)
}
Compile and run:
The End
That’s it. I hope that was useful.