Put UIDatePicker inside static UITableView
In the previous article we implemented input form using UITableView. Static table views provide a great help during iOS applications development: developer can visually create nice looking UIs. One of the common tasks here is to create UI for picking a date. Apple already provides UI element for this: UIDatePicker.
In this article we will embed UIDatePicker into
the UITableViewCell inside
static table view. User will be able to show/hide it by tapping on a
label with date. Apple do this in their Reminders application.
Let’s reproduce this behavior.
Initial Setup
Create a single view application, remove default view from the Main.storyboard and add Table View Controller instead. And don’t forget to make it Initial View Controller. Remove ViewController.swift file as well.
Now, select table view and set it’s Content to Static Cells, Style to Grouped and uncheck Show Selection on Touch:
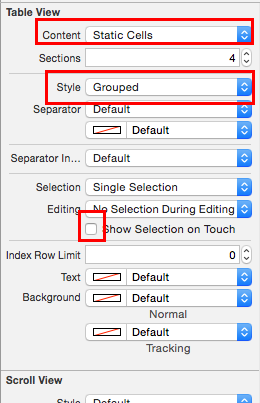
Set number of Sections to 3. First section should have one row, second section - 4 rows, third section - 2 rows. Select all rows and set their Selection property to None.
Rows' Setup
First row
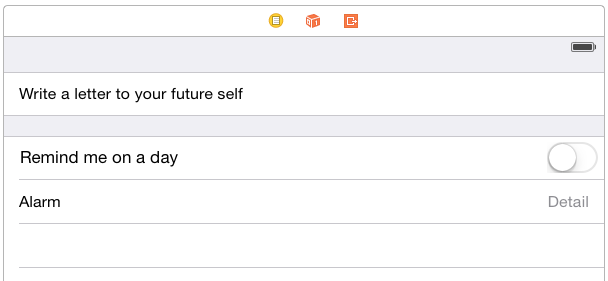
Select first row and set its style to Basic. Double click on a label inside the cell and enter any text. I use "Write a letter to your future self". This is a text for reminder.
Second row
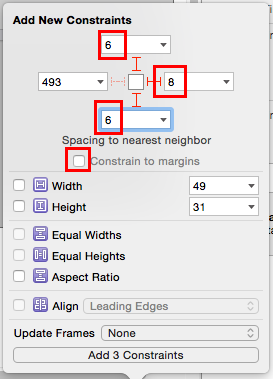
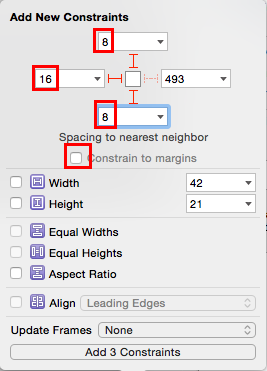
Select second row and set its style to Custom. Drag and drop one label and one switch on it. Place label close to the left edge of the row. Put switch close to the right edge.
Setup Auto Layout constraints for the switch:
Setup Auto Layout constraints for the label:
Double click on the label and set it’s text to "Remind me on a day". Set State of the switch to Off.
Third row
Select third row and set its style to the Right Detail. Double click on Title label and set it’s text to "Alarm".
Table view should have the following look right now:
Fourth row
Select fourth row and resize it:
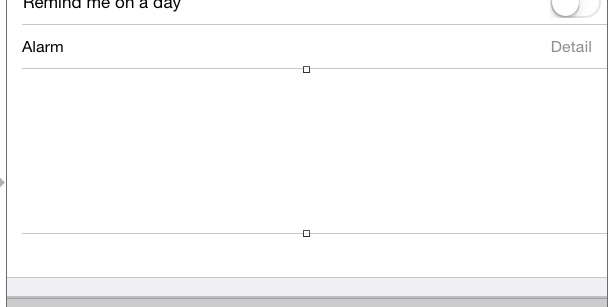
Drag and drop date picker on it and setup Auto Layout (just use Reset to Suggested Constraints on it):

Fifth row
Select fifth row and set it’s style to Right Detail. Set it’s Accessory to Disclosure Indicator. Double click on Title label and set its text to "Repeat". Double click on Detail label and set its text to "Never".
Sixth row
Setup it in the same way as row #2. Set label text to "Remind me at a location".
Seventh row
Set its style to Basic. Set it’s Accessory to Disclosure Indicator. Double click on Title label and set its text to "Location".
This is how your table view should look like now:
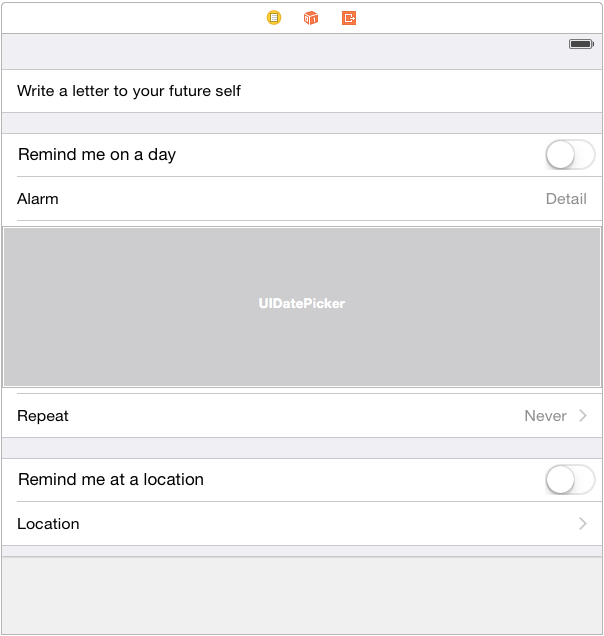
| I decided not to copy the whole UI look and feel of the Reminders application for simplicity. |
Listen to DatePicker’s value changes
We want to update text of the Detail label of third row each time user changes value of the date picker.
Create a new Cocoa Touch Class named TableViewController and set its
base class to UITableViewController. Remove all auto generated code
inside newly created class:
import UIKit

public class TableViewController: UITableViewController {
}
Open storyboard and select table view controller on it. Go to Identity
Inspector and set Class to TableViewController.
Create outlets for detail label and date picker using Ctrl+Drag in Assistant Editor.
@IBOutlet weak var txtDate: UILabel!
@IBOutlet weak var datePicker: UIDatePicker!
Add method that updates label text using date value from the date picker:
@IBAction
public func didChangeDate() {
    txtDate.text = NSDateFormatter.localizedStringFromDate(datePicker.date, dateStyle: .ShortStyle, timeStyle: .ShortStyle)
}
Select date picker and go to Connections Inspector. Drag from its
Value Changed event to this method. Now add viewDidLoad method
override:
public override func viewDidLoad() {
    didChangeDate()
}
This will update label’s text for the first time. Now build the project and run it. If you did everything correct, then label should change its text every time you change value of the date picker.
Toggle date picker on date row tap
We want to toggle date picker when user taps on the cell with Alarm date. Let’s override tableView(_:didSelectRowAtIndexPath:) method:
public override func tableView(tableView: UITableView, didSelectRowAtIndexPath indexPath: NSIndexPath) {
    switch (indexPath.section, indexPath.row) {
    case (1, 1):
        toggleDatePicker()
    default:
        ()
    }
}
This will invoke toggleDatePicker method if user tapped on the row
with index 1 in the section with index 1. And this is the row we need.
How we should implement toggleDatePicker method? We can try to set
row’s hidden property to true. This doesn’t work. We can try to
set it’s height to zero. This also doesn’t work.
In order to achieve our goal we need to use tableView(_:heightForRowAtIndexPath:) method. This method provides heights for each table’s row. So we need a boolean property that holds information about visibility of the row and then use it inside the method to return zero height if date picker should not be visible:
private var datePickerHidden = falsepublic override func tableView(tableView: UITableView, heightForRowAtIndexPath indexPath: NSIndexPath) -> CGFloat {
if datePickerHidden && indexPath.section == 1 && indexPath.row == 0 {
return 0
} else {
return super.tableView(tableView, heightForRowAtIndexPath: indexPath)
}
}This method returns zero height for the date picker row if it should be hidden.
And now we can implement toggleDatePicker method:
private func toggleDatePicker() {
datePickerHidden = !datePickerHidden
// Force table to update its contents
tableView.beginUpdates()
tableView.endUpdates()
}Date picker should be hidden when we load view for the first time:
public override func viewDidLoad() {
didChangeDate()
toggleDatePicker()
}Compile and run…
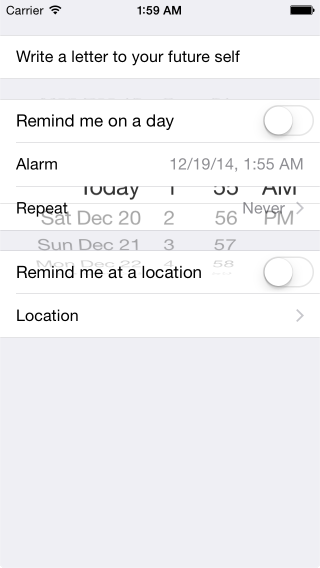
To fix these display issues, you should go to storyboard, select row
that contains date picker and set it’s Clip Subviews property to
true.
Compile and run. Now it works as expected.
Refactoring
Let’s stop for a moment and look into the code we have:
public override func tableView(tableView: UITableView, heightForRowAtIndexPath indexPath: NSIndexPath) -> CGFloat {
    if datePickerHidden && indexPath.section == 1 && indexPath.row == 0 {
        return 0
    } else {
        return super.tableView(tableView, heightForRowAtIndexPath: indexPath)
    }
}
public override func tableView(tableView: UITableView, didSelectRowAtIndexPath indexPath: NSIndexPath) {
switch (indexPath.section, indexPath.row) {
case (1, 1):
toggleDatePicker()
default:
()
}
}I don’t like "magic" numbers here. Also, I don’t like duplication of row identification logic. Let’s fix this:
private enum Row: Int {
    case Reminder
    case RemindMeOnDay
    case Alarm
    case DatePicker
    case Repeat
    case RemindMeAtLocation
    case Location

    case Unknown


    init(indexPath: NSIndexPath) {
        var row = Row.Unknown

        switch (indexPath.section, indexPath.row) {
        case (0, 0):
            row = Row.Reminder
        case (1, 0):
            row = Row.RemindMeOnDay
        case (1, 1):
            row = Row.Alarm
        case (1, 2):
            row = Row.DatePicker
        case (1, 3):
            row = Row.Repeat
        case (2, 0):
            row = Row.RemindMeAtLocation
        case (2, 1):
            row = Row.Location
        default:
            ()
        }

        assert(row != Row.Unknown)

        self = row
    }
}
This enum replaces "magic" numbers with meaningful names, encapsulates
NSIndex → RowName transformation logic, protects from mistakes.
Let’s rewrite our methods using this enum:
public override func tableView(tableView: UITableView, didSelectRowAtIndexPath indexPath: NSIndexPath) {
    let row = Row(indexPath: indexPath)

    if row == .Alarm {
        toggleDatePicker()
    }
}

public override func tableView(tableView: UITableView, heightForRowAtIndexPath indexPath: NSIndexPath) -> CGFloat {
    let row = Row(indexPath: indexPath)

    return datePickerHidden && row == .DatePicker ? 0 : super.tableView(tableView, heightForRowAtIndexPath: indexPath)
}
This code is much better and less error prone.
Toggle other rows
Well, I will not show how to do this. It’s your exercise.
Thanks for reading this.